Connect with us

Fashion

Microneedling: Procedure, Care & What to Expect for Skin

Published

on

Microneedling

Are you ready to rejuvenate your skin and unlock a youthful glow? Microneedling could be the game-changer you’ve been searching for. This innovative treatment uses tiny needles to stimulate collagen production, giving your complexion a fresh start. Whether you’re dealing with fine lines, acne scars, or uneven texture, microneedling offers promising results that can elevate your skincare routine. But before you dive in, it’s essential to know how to prepare for this procedure properly. Let’s explore the ins and outs of microneedling so you can achieve optimal results and unveil beautiful skin!

What is Microneedling?

Microneedling is a minimally invasive cosmetic procedure that involves using fine needles to create tiny punctures in the skin. This process stimulates the body’s natural healing response, promoting collagen and elastin production. The result? Smoother, firmer skin with improved texture.

Often referred to as collagen induction therapy, microneedling targets various skin concerns like scars, wrinkles, and enlarged pores. It can be used on different areas of the body and is suitable for most skin types. With each session, you’re one step closer to achieving a radiant complexion.

At-Home vs. Dermatologist Microneedling

At-home microneedling kits offer a convenient option for those wanting to rejuvenate their skin without visiting a dermatologist. These devices typically feature shorter needles and are designed for safe, superficial treatments. Users can enjoy mild results with consistent use over time.

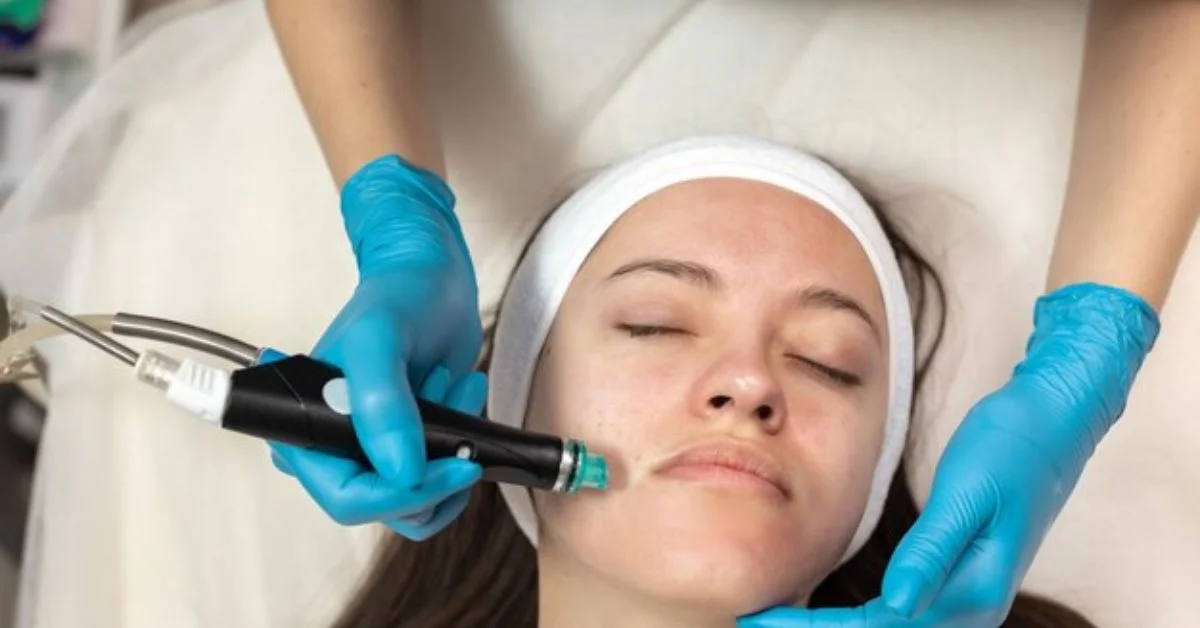
On the other hand, dermatologist-administered microneedling involves professional-grade equipment and longer needles that penetrate deeper into the skin. This method often leads to more dramatic improvements in texture and tone. Professional treatments also include personalized care and post-procedure advice, enhancing overall outcomes significantly.

Are the results the same?

When it comes to microneedling, the results can vary significantly between at-home treatments and those performed by a dermatologist. At-home devices typically offer milder outcomes due to their lower needle depth and limited technology. You might notice some improvement in skin texture, but it’s often subtle.

On the other hand, professional sessions deliver more dramatic results. Dermatologists use advanced equipment that penetrates deeper into the skin, leading to enhanced collagen production and quicker recovery times. This difference is crucial for anyone seeking serious improvements in their skin’s appearance and health.

What results to expect from a dermatologist

When you choose a dermatologist for microneedling, expect noticeable improvements in skin texture and tone. Many clients report reduced fine lines, wrinkles, and acne scars after just one session. The professional-grade tools they use penetrate deeper than at-home devices, leading to more significant results.

Results can vary based on individual skin types and concerns. Typically, optimal outcomes appear within a few weeks as your skin heals and regenerates collagen. Consistent treatments may be recommended for the best long-term benefits, often transforming your complexion over time with each session.

Timing of results and how long they last

After microneedling, most people start to see improvements within a week. The initial healing process reveals smoother skin and enhanced texture. As your body continues to produce collagen, results can keep improving for up to three months.

The longevity of the results varies among individuals, typically lasting six months to a year. Factors like skin type, age, and lifestyle play significant roles in how long you enjoy that fresh glow. Regular touch-up treatments can help maintain those stunning outcomes over time.

Post-Microneedling Care

After your microneedling session, proper care is vital for optimal results. Begin by keeping the treated area clean and avoid touching it with dirty hands. Use a gentle cleanser to wash your face and pat dry with a soft towel.

Hydration is key during the healing process. Apply a soothing serum or moisturizer recommended by your dermatologist to nourish your skin. Avoid sun exposure, harsh products, and strenuous exercise for at least 24 hours post-treatment to minimize irritation and enhance recovery. Your skin will thank you later!

Downtime and side effects

Microneedling typically involves minimal downtime, but some side effects may occur. Patients often experience redness and swelling similar to a mild sunburn right after the procedure. These symptoms usually subside within a few days.

In rare cases, bruising or slight bleeding can happen. It’s important to follow your dermatologist’s advice for post-treatment care to minimize any discomfort. While most people recover quickly, listening to your body and allowing adequate healing time is key for optimal results from microneedling.

Healing process and risks

After microneedling, the healing process typically takes a few days. You’ll notice redness and minor swelling similar to a mild sunburn. This usually subsides within 24 hours, but your skin may feel sensitive for up to a week.

While risks are minimal when performed by professionals, some individuals may experience bruising or prolonged redness. In rare cases, infection can occur if post-treatment care isn’t followed properly. It’s essential to keep the treated area clean and moisturized while avoiding direct sun exposure during recovery for optimal results.

Microneedling Logistics

Microneedling treatments typically last around 30 to 60 minutes, depending on the size of the area being treated. This makes it an easy addition to your skincare routine without taking up too much time.

When selecting a dermatologist, look for someone with experience and positive reviews. Ensure they use sterilized equipment and follow proper protocols for safety. Costs can vary widely based on location and expertise, so it’s wise to research beforehand. Prioritize safety considerations by asking about their training and any potential risks involved in your specific case.

Duration of treatment

The duration of a microneedling treatment typically ranges from 30 to 60 minutes. This can vary based on the size of the area being treated and individual skin concerns.

During this time, your dermatologist will carefully create tiny micro-injuries in the skin with a specialized device. The process is generally quick, allowing you to resume daily activities soon after. However, it’s important to allocate extra time for pre-treatment preparations and post-care discussions with your practitioner to ensure optimal results from your session.

Finding the right dermatologist

Choosing the right dermatologist for microneedling is crucial. Start by researching professionals in your area. Look for licensed dermatologists with specific experience in microneedling techniques. Online reviews and testimonials can provide valuable insights into their skills and patient care.

Don’t hesitate to schedule consultations with a few candidates. Ask about their qualifications, treatment approach, and post-care support. A good dermatologist will prioritize your comfort and answer all your questions thoroughly, ensuring you feel confident moving forward with the procedure.

Costs and safety considerations

The cost of microneedling varies widely, typically ranging from $100 to $700 per session. Factors like the practitioner’s experience, location, and the technology used can influence pricing. While it may seem expensive, consider it an investment in your skin’s health and appearance.

Safety is paramount when considering microneedling. Ensure you choose a licensed dermatologist or trained professional for treatment. This minimizes risks such as infection or improper technique. Always discuss your medical history to tailor the procedure to your needs and enhance safety during recovery.

Candidate Considerations

Microneedling isn’t for everyone. Those with certain skin conditions, like eczema or psoriasis, should steer clear. If you’re pregnant or nursing, it’s wise to consult a healthcare professional before proceeding.

Additionally, individuals with active acne or infections in the treatment area may face complications. Always discuss your medical history and skincare routine with a qualified dermatologist. This ensures you’re making an informed choice tailored to your unique needs and helps maximize the benefits of microneedling for those who are suitable candidates.

Who should avoid microneedling?

Microneedling isn’t suitable for everyone. Individuals with active acne, eczema, or psoriasis should steer clear of this treatment to avoid aggravating skin conditions. If you’re prone to keloid formation or have a history of poor wound healing, it’s best to consult with a dermatologist before proceeding.

Additionally, those on blood-thinning medications or who have recently undergone cosmetic procedures may face complications from microneedling. Pregnant women and individuals with certain allergies should also consider postponing the treatment until they receive professional guidance tailored to their unique circumstances.

READ MORE:Weight Loss Injections: Benefits, Risks & Options Explained

Pre-treatment tips for optimal results

For optimal results with microneedling, preparation is key. Start by consulting with a qualified dermatologist who can assess your skin and determine if you’re an ideal candidate. Hydration plays a crucial role; drink plenty of water leading up to your appointment.

Avoid blood thinners like aspirin or alcohol for at least 48 hours prior, as these can increase bruising. Consider investing in quality skincare products that contain hyaluronic acid and peptides to condition your skin pre-treatment. Ensure you arrive at the clinic without makeup on the day of your procedure—this allows for better treatment effectiveness and minimizes the risk of irritation.

By following these tips, you’ll set yourself up for smoother recovery and enhanced results from your microneedling session.

Continue Reading
Click to comment

Leave a Reply

Your email address will not be published. Required fields are marked *

Fashion

Stunning Snake Tattoo Ideas: Designs, Trends & Meanings

Published

on

Snake Tattoo

When it comes to tattoos, few designs carry the allure and symbolism of a snake. These slithering creatures have long been associated with mystery, transformation, and rebirth. Whether you’re drawn to their exotic appearance or the deep meanings they hold in various cultures, a snake tattoo can be an unforgettable addition to your body art collection.

From intricate patterns that coil around limbs to vibrant colors that burst with life, there’s no shortage of inspiration for those considering this captivating design. With social media platforms like Pinterest and Instagram overflowing with creative ideas, finding the right snake tattoo has never been easier—or more exciting.

In this article, we’ll explore stunning examples from Pinterest that will ignite your imagination. We’ll delve into what makes these tattoos so popular and introduce you to unique concepts from Inkbox that push boundaries in body art. Plus, we’ll showcase some mesmerizing videos and designs making waves on social media today. Ready to embark on a colorful journey through the world of snake tattoos? Let’s dive in!

Pinterest Collection of Stunning Snake Tattoo Designs

Pinterest is a treasure trove for tattoo enthusiasts, and snake tattoos are no exception. The platform is brimming with diverse designs that cater to every style and preference. From minimalistic outlines to elaborate full-sleeve masterpieces, there’s something for everyone.

One popular trend features snakes intertwined with flowers. These designs blend the natural beauty of blooms with the fierce symbolism of serpents. Imagine a vibrant rose wrapped around a coiled snake—this fusion creates stunning visual contrasts that tell powerful stories.

Geometric shapes also make an appearance in many Pinterest finds. Snakes depicted within triangular or circular patterns offer an edgy twist on traditional tattoo artistry. This modern approach appeals to those seeking uniqueness while still embracing classic themes.

Watercolor tattoos have gained immense popularity lately, showcasing snakes in vivid colors bleeding into one another like a beautiful watercolor painting. The fluidity of these designs adds depth and emotion, making each piece feel alive and dynamic.

For fans of realism, hyper-detailed serpent tattoos capture every scale and curve with incredible precision. Such meticulous work can transform your skin into a canvas where nature’s wonders come to life in three dimensions.

Tribal-inspired snake tattoos evoke ancient symbolism while maintaining contemporary flair. Bold lines and intricate details create striking imagery that honors cultural significance without sacrificing personal style. Each design tells its own story through rich history woven seamlessly into modern aesthetics found on Pinterest today.

Reasons Behind the Popularity of Snake Tattoos

Snake tattoos have surged in popularity for a variety of reasons. Their intricate design possibilities make them incredibly appealing to tattoo enthusiasts. From the sleek, curled body of a snake to its striking scales and vibrant colors, these tattoos can be as detailed or minimalistic as one desires.

Symbolism plays a significant role in their allure. Snakes are often associated with transformation and rebirth due to their ability to shed skin. This makes them an ideal choice for those who want a tattoo that represents personal growth or change.

Cultural significance also adds depth to the appeal of snake tattoos. Across many cultures, snakes symbolize wisdom, protection, and healing. In ancient mythology, they were revered creatures embodying both danger and beauty—an enticing combination for anyone considering this form of body art.

The versatility is another factor driving interest in snake designs. Whether you’re drawn to traditional styles or modern interpretations featuring geometric shapes or watercolor techniques, there’s boundless creativity available within this theme.

Social media platforms like Instagram and Pinterest showcase stunning snake tattoo ideas daily. These visual inspirations encourage more people to explore their options when it comes time for ink selection.

The rebellious nature associated with snakes resonates with many individuals seeking bold expressions through body art. Choosing a snake tattoo reflects courage and individuality; after all, not everyone opts for such fierce imagery on their skin.

Exploring Unique Snake Tattoo Ideas from Inkbox

When it comes to snake tattoos, Inkbox offers a treasure trove of unique designs that stand out from the crowd. Their innovative approach allows you to experiment with temporary ink, making it easy to find the perfect design before committing permanently.

One popular option is the minimalist snake tattoo. These designs often feature sleek lines and subtle curves, capturing the essence of a snake without overwhelming detail. It’s an ideal choice for those who appreciate simplicity but still want something eye-catching.

Another captivating idea is the floral snake tattoo. This style blends serpentine shapes with beautiful blooms, creating a striking contrast between danger and beauty. The vibrant colors of flowers can breathe life into traditional black ink, adding an extra layer of meaning to your body art.

For those interested in mythology or symbolism, consider exploring tribal or geometric snake tattoos available on Inkbox. These designs often carry rich cultural significance while showcasing intricate patterns that can tell a story about strength or transformation.

If you’re feeling adventurous, why not try combining multiple elements? A serpent entwined with other creatures like butterflies or skulls creates intriguing narratives that reflect personal experiences and beliefs—making each piece truly one-of-a-kind.

Inkbox also provides options for customizing your design further. You can mix colors or add text alongside your chosen image for added personalization. With these flexible choices at your fingertips, finding a unique snake tattoo has never been more exciting!

Social Media Spotlight: Captivating Snake Tattoo Videos and Designs

Social media has transformed the way we discover art, including tattoos. Among the vast array of designs, snake tattoos have carved out a special niche that captivates audiences around the world. Platforms like Instagram and TikTok are overflowing with creative interpretations of this timeless symbol.

Videos showcasing snake tattoo processes offer an intimate look at artists’ techniques. Watching ink flow onto skin can be mesmerizing. The transformation from canvas to completed artwork is often breathtaking, revealing intricate details that are sometimes missed in still images.

Many artists use social media to share their unique takes on snake tattoos. From geometric patterns to realistic renders, there’s something for everyone’s taste. These platforms allow fans not only to admire but also to engage with creators directly by commenting or asking questions about their craft.

Trends emerge rapidly within these communities. One week, you might see delicate minimalist snakes wrapped around limbs; next week could feature vibrant colors and elaborate scenes depicting mythological tales with serpents as central characters. This constant evolution keeps followers coming back for more inspiration.

Hashtags play a significant role here too—#SnakeTattoo brings together thousands of posts curated from different styles and cultures worldwide, giving viewers a sense of global artistry surrounding this theme. It creates a diverse tapestry where traditional meets contemporary seamlessly.

For those considering getting inked or simply exploring designs online, there’s no shortage of captivating content available across various channels today! Whether you’re looking for ideas or just admiring beautiful craftsmanship, social media serves as an endless source of inspiration when it comes to snake tattoos.

Conclusion

Snake tattoos have become a symbol of transformation, mystery, and elegance. Their unique designs offer endless possibilities for self-expression. Whether you’re drawn to intricate details or bold colors, there’s a snake tattoo idea that can resonate with your personal style.

As seen in the stunning collections from Pinterest and platforms like Inkbox, these tattoos can take on various forms—from minimalist outlines to vibrant full-sleeve pieces. The popularity behind snake tattoos ties into their rich symbolism across cultures, representing everything from rebirth to protection.

Social media is also buzzing with captivating videos showcasing creative snake tattoo ideas that inspire many to get inked. These visuals not only highlight artistic talent but also encourage collectors and first-timers alike to explore this versatile design.

With all these elements combined—design inspiration, cultural significance, and social media influence—it’s easy to see why so many are eager to adorn their bodies with the beauty of snake tattoos. If you’re considering your next piece of art, perhaps it’s time to embrace the charm of serpents slithering elegantly onto your skin.

Continue Reading

Fashion

Short Almond Nails: Chic Designs and Trendy Ideas For You

Published

on

Short Almond Nails

Short almond nails are taking the beauty world by storm, combining sophistication with practicality. This chic shape is perfect for those who want to express their style while keeping things manageable. Whether you’re heading to work or enjoying a night out, these nails can elevate any look without sacrificing comfort or functionality. From trendy designs to easy maintenance tips, we’ll explore everything you need to know about short almond nails and how they can become your new favorite fashion statement. Ready to dive into this stylish realm? Let’s get started!

Trending Designs and Ideas

Short almond nails offer endless opportunities for creativity with trending designs. From sleek chrome finishes to the warm charm of tortoise shell patterns, there’s something for everyone. Pearl adorned nails bring an elegant touch, while red French tips add a classic flair.

For those who crave fun and whimsy, pink cherry accents or sparkling glitter French tips are perfect choices. Leopard print can unleash your wild side, whereas rainbow tips celebrate vibrant colors in a playful way. Explore these styles and find your favorite!

Chrome Nails

Chrome nails are a stunning choice for those who want to make a statement with short almond nails. The reflective finish creates an eye-catching effect that catches the light beautifully, making your manicure stand out in every setting.

This trend can be customized in various colors, from classic silver to vibrant hues. Whether you prefer a subtle shine or bold metallics, chrome nails elevate any look while maintaining practicality and elegance. They’re perfect for both everyday wear and special occasions.

Tortoise Shell Nails

Tortoise shell nails are a chic and timeless choice that easily elevates any look. This design combines warm amber and rich brown tones, resembling the classic tortoiseshell pattern that’s both sophisticated and trendy.

Perfect for short almond nails, this style complements various outfits. Whether you opt for a glossy finish or matte look, tortoise shell instantly adds elegance to your hands. The unique blend of colors makes each nail a work of art while remaining effortlessly stylish.

Pearl Adorned Nails

Pearl adorned short almond nails add a touch of sophistication to any look. The soft, iridescent finish of pearls creates an effortlessly chic vibe. This design perfectly balances elegance with everyday wearability.

You can mix pearl accents with your favorite colors or keep it simple with a nude base. Whether you choose tiny pearl embellishments or larger statement pieces, these nails are sure to catch the eye and elevate your style game in a subtle yet stunning way.

Red French Tip Nails

Red French tip nails are a bold twist on the classic design. The striking contrast of vibrant red against a neutral base adds an element of sophistication and fun. This look is perfect for those who enjoy making a statement without sacrificing elegance.

Pairing red tips with different nail shapes can enhance its appeal further. Whether you opt for short almond nails or another shape, this trend brings style to any occasion. It’s versatile enough for everyday wear or special events alike.

Pink Cherry Nails

Pink cherry nails are a delightful choice for anyone looking to add a playful touch to their manicure. This design features soft pinks adorned with tiny, hand-painted cherries that bring a whimsical flair. The vibrant colors pop without overwhelming your look.

These nails perfectly blend fun and femininity, making them ideal for all occasions. Whether you’re heading to brunch or an evening out, pink cherry nails will make your fingertips the center of attention while keeping things chic and stylish.

Glitter French Tips

Glitter French tips are a dazzling twist on the classic manicure. They bring a touch of sparkle to your short almond nails, making them perfect for special occasions or even everyday wear. The combination of a clean white tip with shimmering glitter elevates this design, creating an eye-catching contrast.

You can customize the glitter intensity to match your mood or outfit. Whether you choose subtle shimmer or bold sparkles, these tips add elegance and fun to any look. They’re all about embracing creativity while keeping things classy.

Leopard Print

Leopard print is a bold choice for short almond nails, offering a fierce look that stands out. This design effortlessly combines wild beauty with the elegance of the almond shape.

Opt for classic brown and black spots or experiment with vibrant colors like pink or blue. The versatility of leopard print allows you to express your personality while keeping it chic and sophisticated. Whether you’re dressing up for a night out or adding flair to your everyday style, this design won’t disappoint.

Rainbow Tips

Rainbow tips are a playful twist on the classic nail design. With their vibrant colors blending seamlessly, they add an eye-catching flair to any outfit. Whether you opt for pastel hues or bold shades, this design brings joy and creativity to short almond nails.

Perfect for summer festivals or casual outings, rainbow tips can be customized to reflect your personality. Mix and match colors or go for an ombre effect—there’s no limit to how you can express yourself with this fun trend!

Mermaid-Inspired Teal Nails

Mermaid-inspired teal nails are a stunning choice for those who want to embrace a whimsical vibe. The captivating shades of aqua and turquoise create an enchanting look that draws the eye, making you feel like you’ve stepped out of a fairytale.

Adding shimmering accents or iridescent glitter can elevate this design even further. Imagine tiny flecks of gold or silver catching the light, mimicking ocean waves. Whether you’re headed to the beach or just want to feel like summer every day, these nails bring magic to your fingertips.

French Tip Press-Ons

French tip press-ons offer a chic and hassle-free way to sport the classic look of short almond nails. They combine sophistication with convenience, making them perfect for any occasion.

Available in various styles and colors, you can easily find the right set that matches your outfit or mood. The best part? You can switch them up whenever you want without committing to a salon visit. Embrace elegance with these simple yet stunning press-on designs today!

Almond Press-Ons

Almond press-ons are a convenient way to achieve that chic almond shape without the commitment of salon visits. They come in various styles and designs, catering to every taste and occasion. You can easily switch them up for a night out or keep it simple for everyday wear.

What’s great about these press-ons is their ease of application. With just a little adhesive, you can transform your nails in minutes. Plus, they’re perfect for those who want to experiment with different looks effortlessly.

Matte Gel-X Tips

Matte Gel-X tips offer a chic alternative to traditional glossy finishes. Their soft, muted look enhances the elegance of short almond nails while providing a modern twist. These matte styles can be worn solo or dressed up with nail art for added flair.

The texture is not just visually appealing but also practical. Matte surfaces are less prone to visible scratches and chips, ensuring your manicure stays fresh longer. With various colors available, it’s easy to find the perfect shade that complements your style.

Crystal and Metallic Designs

Crystal and metallic designs on short almond nails add a touch of glam that can elevate any look. These styles beautifully play with light, creating stunning visual effects. Tiny crystals can be strategically placed for an elegant sparkle, while metallic accents provide a bold statement.

Mixing chrome finishes with delicate rhinestones creates a striking contrast that’s both chic and eye-catching. Whether you opt for subtle details or full-on bling, these designs ensure your nails stand out in the best way possible.

Shopping Options

When it comes to short almond nails, shopping for the perfect set can be exciting. Online collections offer a vast array of styles and colors, ensuring you find something that matches your personality. Many reputable brands have curated designs that cater to both elegance and fun.

For those who love convenience, press-on options are a game changer. They come in various sizes and finishes, making it easy to achieve salon-quality results at home. Nail kits with everything you need can also be an excellent investment for DIY enthusiasts.

Online Collections

Discover a treasure trove of short almond nails in various online collections. Many websites curate stunning designs, catering to every taste and occasion. From chic minimalism to bold patterns, the options are endless.

You can easily browse through galleries filled with inspiration and unique styles. Plus, shopping online allows you to compare prices and read reviews before making a decision. Convenience meets creativity when it comes to finding that perfect set for your next nail appointment or DIY project!

Press-On Options

Press-on nails are revolutionizing the way we approach manicures. They come in various styles and lengths, making them perfect for anyone wanting to try short almond nails without commitment. Whether you prefer bold designs or subtle hues, there’s a press-on set that suits your taste.

These options offer convenience and ease of use. Simply apply them at home in minutes for an instant nail makeover. Plus, they are affordable and reusable if cared for properly, making them a smart addition to your beauty routine.

Different Nail Kits

Finding the right nail kit can transform your short almond nails into a masterpiece. Many kits cater to both beginners and pros, offering everything from basic tools to advanced designs. Look for sets that include high-quality polish, brushes, and various embellishments.

Some kits even come with step-by-step instructions or online tutorials. This makes it easier than ever to experiment with new styles at home. With so many options available, you’re bound to find the perfect kit that suits your style and needs.

Gel Nail Extensions

Gel nail extensions are a fantastic choice for those seeking the beauty of long nails without sacrificing practicality. They provide a smooth, glossy finish and can be shaped into perfect almond forms, enhancing your style.

These extensions are also durable and resistant to chipping. With proper care, they maintain their stunning appearance longer than traditional polish. Plus, they’re versatile enough to accommodate various designs—from simple elegance to intricate art—making them a popular option for short almond nails enthusiasts.

Maintenance and Care

Maintaining short almond nails is essential for keeping them looking fresh and elegant. Start with pre-shaped tips to save time during application. Proper nail care routines can extend their life, so invest in quality products.

When applying your nails, ensure a clean surface for better adhesion. Use gentle techniques for removal to avoid damaging your natural nails. Incorporate nail art accessories like files and cuticle oils into your routine to keep everything neat and polished without much hassle.

Pre-Shaped Tips

Pre-shaped tips are a game changer for anyone looking to achieve stunning short almond nails effortlessly. These ready-to-use nail extensions come in various sizes and styles, allowing for quick application while ensuring a perfect fit.

Made from durable materials, they maintain their shape beautifully without compromising on strength. Simply file and buff them to your desired length or finish. They’re ideal for both beginners and pros who want to save time while still rocking elegant nail designs.

Application Techniques

Achieving the perfect look with short almond nails requires careful application techniques. Start by preparing your natural nails; clean, buff, and push back cuticles for a smooth surface. Use a base coat to protect your nails and enhance adhesion.

When applying polish or nail art, work from the center outwards for even coverage. Thin layers prevent bubbling and allow quicker drying. For intricate designs, consider using nail tape or dotting tools to achieve precision without compromising style.

Removal Tips

Removing short almond nails carefully is essential to avoid damaging your natural nails. For gel or acrylics, soak cotton balls in acetone and place them on your nails with foil wraps for about 15 minutes. This helps loosen the product.

Gently push off the softened material using a wooden stick or cuticle pusher. If you encounter resistance, re-soak your nails instead of forcing it off. Finish by cleaning up any residue and applying a nourishing nail oil to keep them healthy.

Nail Art Accessories

Nail art accessories are essential for anyone looking to elevate their short almond nails. From dotting tools and brushes to nail tape and rhinestones, the right accessories can spark creativity. You can mix and match designs effortlessly when you have a well-stocked kit.

Consider investing in quality tools that make application easier. Stickers and decals provide quick options for those busy days, while foils add a luxurious touch. Whether you’re going for minimalist or elaborate designs, having these accessories on hand will ensure your nails always look polished.

With so many styles to explore, short almond nails offer both elegance and practicality. Embrace the versatility they bring to your everyday look!

Continue Reading

Fashion

Top 5 Essential Hair Growth Oils for Scalp and Hairs Health

Published

on

Hair Growth Oil

Are you tired of struggling with thinning hair or lackluster locks? If so, you’re not alone. Many people seek natural solutions to enhance their hair’s growth and vitality. Enter essential oils—nature’s little powerhouses packed with nutrients that can transform your mane! These concentrated extracts have been celebrated for centuries, not just for their delightful fragrances but also for their impressive health benefits. Ready to discover the top five essential hair growth oils that can unlock your hair’s full potential? Let’s dive in and explore how these magical elixirs can elevate your hair care routine!

Understanding Essential Oils for Hair Health

Essential oils are concentrated plant extracts known for their therapeutic properties. When it comes to hair health, these natural oils can offer a multitude of benefits. They contain vitamins and nutrients that nourish the scalp and promote healthy hair growth.

Many essential oils possess antimicrobial properties that help create a balanced environment on the scalp. This balance is crucial for preventing issues like dandruff or excess oil production, which can hinder growth.

Using essential oils in your hair care routine not only enhances overall shine but also strengthens each strand from root to tip. Incorporating them into your regimen could be just what you need for vibrant and thriving locks.

Top Essential Hair Growth Oils

Essential hair growth oils have gained popularity for their ability to promote hair growth and improve overall hair health. Among the various options, rosemary essential oil stands out as a powerhouse. It stimulates blood circulation in the scalp, encouraging healthy hair follicles.

Biotin, or vitamin B7, is another vital ingredient that works wonders when combined with essential hair growth oils. This nutrient strengthens the hair’s structure and supports new growth from within.

Neem oil deserves mention too; it’s packed with antioxidants that combat dandruff while nourishing the scalp. Its antibacterial properties create an ideal environment for flourishing hair growth and vitality.

Rosemary Essential Oil

Rosemary essential hair growth oil is a powerhouse when it comes to hair growth. This fragrant herb has been used for centuries not only in cooking but also in natural remedies. Its ability to stimulate blood circulation on the scalp enhances nutrient delivery to hair follicles.

Rich in antioxidants, rosemary oil helps combat oxidative stress that can lead to premature hair loss. It contains rosmarinic acid, known for its anti-inflammatory properties, which supports a healthy environment for hair growth.

Using rosemary essential oil may also improve overall scalp health by reducing dandruff and itchiness. Incorporating this versatile oil into your routine could very well be the boost your hair needs to thrive naturally.

Biotin (Vitamin B7)

Biotin, also known as Vitamin B7, is a vital nutrient for hair health. It plays a crucial role in the production of keratin, the protein that makes up your hair strands. A deficiency in biotin can lead to thinning hair and even loss.

Incorporating biotin into your routine can significantly enhance your mane’s strength and shine. Many people find that it helps reduce breakage and promotes overall scalp health. This vitamin not only supports growth but also improves texture.

You can find biotin in various foods like eggs, nuts, and leafy greens or take supplements designed specifically for hair growth oil blends. Regular use may help you achieve thicker locks over time.

Neem Oil

Neem hair growth oil is derived from the seeds of the neem tree, known for its powerful healing properties. It contains essential fatty acids and antioxidants that nourish hair follicles, promoting healthy growth. Its antibacterial and antifungal qualities help maintain a clean scalp, preventing dandruff and other conditions detrimental to hair health.

Using neem oil can also strengthen your hair shafts, reducing breakage and split ends. This natural remedy enhances shine while improving overall texture. With consistent use, you may notice thicker strands over time.

To incorporate neem oil into your routine, mix it with a carrier hair growth oil like coconut or jojoba before applying it to your scalp. This boosts absorption and maximizes benefits for luscious locks.

Lavender essential oil

Lavender essential oil is a standout choice for promoting hair growth. Its calming scent not only soothes the mind but also stimulates blood circulation in the scalp. Improved circulation means better nutrient delivery to hair follicles, fostering healthier and stronger hair.

This versatile oil has natural antifungal and antibacterial properties, making it ideal for maintaining a clean scalp environment. A healthy scalp is crucial for preventing issues like dandruff that can hinder hair growth.

Using lavender essential hair growth oil in your routine can also help reduce stress levels, which are often linked to hair loss. By incorporating this aromatic oil into your regimen, you may find both relaxation and revitalized locks.

Lavender essential oil

Lavender essential oil is renowned for its calming fragrance, but it also offers remarkable benefits for hair growth. Its natural properties help to improve blood circulation in the scalp, providing essential nutrients directly to hair follicles. This increased blood flow can stimulate hair growth and combat thinning.

Moreover, lavender has antimicrobial qualities that keep the scalp healthy by preventing dandruff and other irritations. A healthy scalp environment is crucial for optimal hair health and growth.

Using lavender hair growth oil in your routine can be a soothing experience as well. Add a few drops to your shampoo or conditioner, or mix it with a carrier oil for a relaxing scalp massage that promotes both relaxation and revitalized hair growth.

How to Use Essential Oils for Hair Growth

Using essential oils for hair growth is simple and effective. Start by diluting a few drops of your chosen oil with a carrier oil, such as coconut or jojoba oil. This helps to prevent skin irritation while enhancing the benefits.

Once diluted, massage the mixture into your scalp using circular motions. This stimulates blood circulation and encourages hair follicles to thrive. Focus on areas where you notice thinning or loss.

Allow the oil blend to sit for at least 30 minutes before washing it out with a gentle shampoo. For best results, repeat this process 2-3 times a week. Consistency is key when incorporating these natural remedies into your hair care routine.

Expected Results and Timeline

When using hair growth oil, patience is key. While some individuals might notice improvements in their hair texture and shine within a few weeks, visible changes in hair density usually take longer. Typically, you can expect to see significant results after three to six months of consistent use.

Each person’s hair growth cycle varies based on genetics, health factors, and lifestyle choices. Keeping track of your progress through photos or notes can help motivate you during this journey.

Incorporating essential oils into your routine is just one part of the equation. A balanced diet and proper scalp care also play crucial roles in promoting healthy and vibrant hair.

Choosing the Right Essential Oil Blend

Selecting the right essential oil blend for hair growth requires a bit of research. Consider your specific hair type and any underlying issues, such as dryness or dandruff. Some oils may work better for oily scalps, while others are ideal for dry hair.

You might want to combine several oils to enhance their benefits. For example, pairing rosemary with peppermint can stimulate circulation while adding nourishment from jojoba oil can help moisturize the scalp. Experimenting with different combinations will help you discover what works best.

Always perform a patch test before applying new blends to ensure there’s no allergic reaction. Quality matters too; choose pure, organic oils free from synthetic additives for optimal results in your journey toward healthier hair growth.

Conclusion

Exploring essential hair growth oils can open up new pathways to a healthier mane. Each of the oils discussed has unique properties that not only promote hair growth but also improve overall scalp health. Incorporating these natural remedies into your routine might be just what you need to achieve luscious locks.

Remember, consistency is key when using hair growth oil. Results may vary based on individual factors like genetics and lifestyle choices. The journey towards vibrant, healthy hair is often gradual but rewarding.

Choosing the right blend tailored to your specific needs can amplify results even further. Embrace the natural power of essential hair growth oils and enjoy boosting both your confidence and your curls!

Continue Reading

Trending